


@655321 decals very small decals and I bought 3 of those sets so there is that. Lol
4E43E286-8F3E-4AC1-84BC-E732B0B7EB2F.jpeg CA95B30E-914A-4105-9C05-22B533ECF2FF.jpeg
Insane level of detail on these ships! Well done.
How many years of painting miniatures do you have behind you?
Thanks, guys. I was impressed when I saw the lifeboats, too- they’re better in person because they’re built up with lots of layers of pigment so they look like they’re molded in on the sculpt (well, they actually are on HBG’s Nagara light cruisers). I’m trying to up the level of detail on the aircraft I’m doing for our set to match FJO’s IJN level of detail. I especially like the top down view of the 1st edition battleships to see the detail he’s added. Years of experience? FJO has been a professional painter for a few decades now (see brief description in opening post), and we’re both in our mid 50’s & started painting our D&D miniatures back when we were in high school.
I’ve mentioned one of the 18 decal Stukas in another post, as well as HBG’s JU-87G Stukas that I like so much, so since these are done I thought I’d share some shots of them.


I just finished this piece last night and I’m so happy with it that I wanted to share it here. Bit of back story- while researching aircraft paint schemes I came across a game called “Check Your 6!”. One of the scenarios in that game is based on a real encounter wherein pilot “The Swede” Vejtasa in an SBD from the Yorktown, while on submarine patrol, shot down 3 Zeros in an engagement. With magnets in our aircraft for the carriers, we were half way to playing CY6 anyway, so I got some Legos from their website and some acorn nuts from the hardware store and made flight stands. So of course I had to make Vejtasa’s SBD. I got REALLY lucky with i-94 decals for this project. Their sheet of American flags has one the perfect size to be cut down for the red and white striped rudder of this SBD- 7 red stripes from the top tip of the rudder down to the rear wings at the base of the rudder. Measure twice, cut once for a perfect fit front to back. That saved me a ton of time and headache on an accurate rudder. And i-94’s sheet of black letters and numbers had numbers the perfect size for the fuselage and tail. The one thing that was sort of bummer is that their US roundels come with the red dot as a separate decal that you have to add and perfectly, and I mean PERFECTly, center in the star to make it look right. So because there wasn’t a “10” decal on the sheet, the 1 and the 0 are 2 separate decals, as are each US star & dot roundel and each half of the rudder, making this aircraft number one in number of decals with twenty decals total. There are tons of references for this aircraft all over the internet that helped a lot in drawing the cockpit. I used the .005 pen rather than the 20/0 brush with fuselage color so it would pop better and help make the aircraft more recognizable as what it is. Decal sheets used are (copy & pasted from HBG’s site) Black Lettering Decal Sheets (LB-100), U.S. Flags (US-118), U.S. Star on blue field (US-102). Base of the stand is a Lego radar dish.


This piece got a make-over when I started experimenting with making decals with the Testor’s kit (mentioned with example later in the post). Some of the bottom is hand inked, but the landing gear part is decal.

Really, superb work. These are really good. :-)
IJN Nagato & Mutsu from HBG. Roughly 18 hours on each piece by FJO’s estimate. There was a discussion whether to include gun barrels on the deck guns- I thought the ships looked great without, and then saw them with them in and it made a huge difference. They fit better alongside the Kongo BB’s with the barrels added. I found a schematic and a nice picture of a large scale model and printed those for paint references and gave the print to FJO, shown below. Each has a launch catapult added, one angled for launch that will get a small plane, and the other in neutral position that won’t have a plane. The flash washes out some of the contrast on the pieces so it may be a bit difficult to see there are 3 different greys on the hulls, and 2 and 3 colors of the same shade on each respectively on the deck colors. As with all HBG pieces, these have a lot of nice detail molded in and FJO highlighted all those, like the deck guns, and added more things like the life boats shown on the schematic and model picture, and rails on the catapult deck and other small details. I kept trying to get a picture with both ships in focus but the camera didn’t want to cooperate, so I just combined the best shots into one, with different ships in better focus in each. Best viewed by right clicking and opening in a new frame.


IJN Nagato & Mutsu rear view and top view for a better view of the deck detail.


IJN Fuso class ships from HBG. We’re using them as heavy cruisers. Lots of nice detail in the sculpt but the deck guns are only molded in on one side so FJO had to make them on the other side to match the schematic I found for him online. He calculated roughly 25 hours on these 3 pieces over the last 2 weeks. That time may also include the conning tower makeover and plane on the launch catapult for the Mutsu, but I forgot to ask.


Here’s the Mutsu after the front base of the conning tower was redone and the scout plane was added to the launch catapult. Compare this shot with the ones from earlier and you can really see the difference on the front tower and the scout plane area.

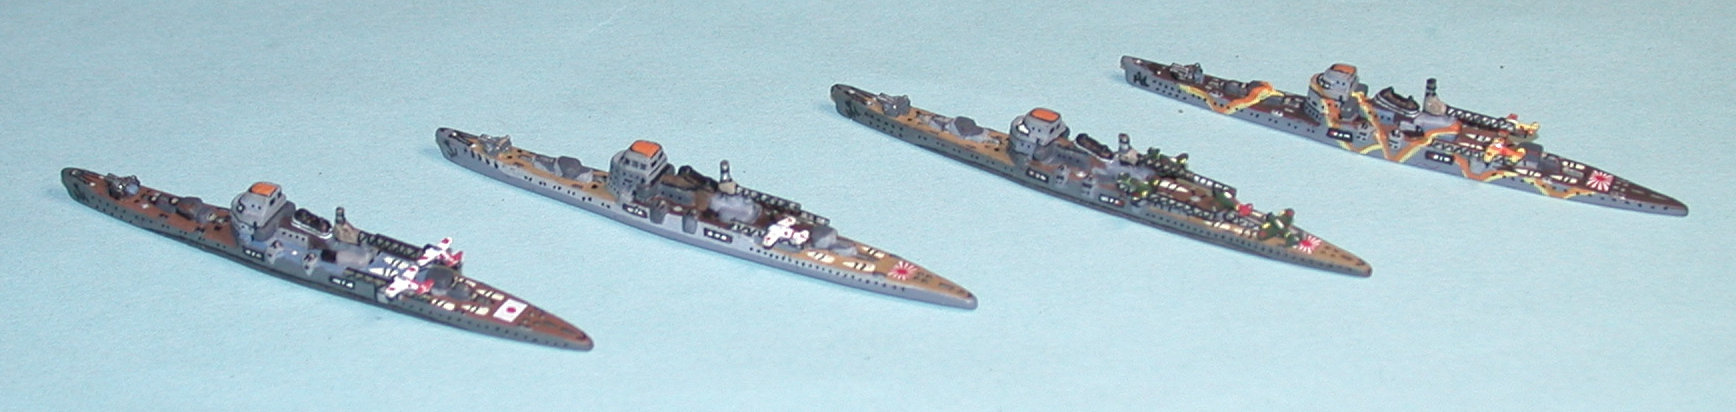
I got a hold of the shots of the Mogami cruisers in progress and wanted to share them to show the mods that were done. One turned out to be a Tone class, so it’s actually 3 Mogami class and 1 Tone. As with all the sculpts, they started with a coat of primer (red in this case), and then the flashing is trimmed and any uneven edges between halves of the sculpt are leveled. Mogamis had smaller conning towers than the Takao class these were made from, so the towers were cut off and sanded down before being glued back in place. While they were off, the smoke stacks got filed in front and top, and putty was added between them to match the profile on the schematic of the Mogami smoke stacks. Holes were drilled to accept a small brass rod for the scout plane retrieve crane, and sections of the round rod were squared with a file to make the crane arm, then super glued to the round rod to complete the crane. More small sections were squared with a file to make the launch catapults that were glued in later. (A few of my Oscars are in the top picture waiting to get their canopies done.) These are pretty big files best viewed by right clicking and opening in another window.


The Mogamis also got more putty added to the sides to make the bulges where the catapult launch arm is attached and the extra port and starboard AA guns were added. The putty is formed while it’s still soft to as close a shape as it can get, then sculpted and filed after it hardens. The launch catapults for the scout planes have been added above the bulge they hinge from, and the extra forward deck guns taken from the GHQ carrier have also been added.


The little tiny planes from GHQ were painted before they were super glued into place, and another look at the four from the rear to see the aircraft.
.jpg)
I wanted to post these last Sunday but that Midwest ice storm knocked out the power for 3 days. FJO has started doing the Japanese transports after a bit of research into the sculpts. He found a lot of pictures of Japanese merchant ships that the game sculpts are based on, so he’s going to do a bunch of different paint schemes matching the various pictures to make each transport different from the rest. The first one, a sculpt from A&A '41, is done up as the Kita Maru. This was started Friday and finished Saturday.


The Kita Maru port & starboard.


Next up is the other Japanese transport sculpt from the most recent 2nd Ed., this one done as the IJN Nagitsu Maru.


Rolling Advanced Artillery in our house rules opens up tank killers- the JU-87G from HBG shown earlier is the only flying tank killer we can find a sculpt for. The British put some 40mm cannon on a Hurricane and called it a Mk IID, so I grabbed a section of FJO’s little brass rods he uses for his mods and cut some cannons and super glued (with gel so it left a nice thick coat) them under the wings of one of the Hurricanes I got from Shapeways. Paint scheme is based on a Mk IV found on Wings Palette (which is a great source for aircraft paint and decal references: http://wp.scn.ru/en/ww2/f/79/9/16).


FJO has been knockin’ out the transports lately. These two were done last week- the Takatsu Maru and the Kinjosan Maru. There’s some added putty on the Takatsu Maru- just a little in the center of the top.


The Teia Maru has a lot of room for troops to travel in comfort. FJO also finished the last 2 Japanese aircraft- one of Egusa Takeshige’s Vals and a Ki-43 Oscar. I saved those 2 for him to paint after I did the rest of the IJAF and it took him almost a year to get to them, but he did them proud.


I broke off the landing gear from some Shapeways ME-109E’s and gave them to FJO to use somehow, and they became funnels on the transport IJN Macassar Maru, alongside a smokestack made from a German tank barrel. Check out the mods on the pilot house, too. The IJN Asama Maru has smoke stacks made from the posts that represent the cranes on the French transports, as well as other modifications to the deck and aft poop deck.


I think there are now 12-14 Japanese transports done, some as submarine tenders and oilers. They’re all from Combinedfleet.com, a great history site with old pictures and tabular records of movement of each ship in the IJN. These two received some Me-109 landing gear as vent/funnels and putty mods. The San Pedro Maru started as a '41 sculpt I got from HBG and got a smoke stack on the aft deck with the funnels along with fore deck guns from a french transport, and the Santos Maru started as a Pacific '40 2nd Ed piece. The '41 sculpt has the molded-in windows filled with putty to make a better painting canvas for a more accurate depiction of the San Pedro Maru. The Santos Maru has an extensively modified deck and pilot house with a smoke stack and funnel vents.


The Hokoku Maru was a merchant raider with a very interesting history available here: http://www.combinedfleet.com/Hokoku_t.htm. We were looking for camo patterns to go with the IJN camo fleet pieces and this was the first we came across. After reading it’s history, FJO had to do it. The camo pattern posed a bit of a challenge while painting, and there are extensive modifications to the piece. Comparing the finished piece to the references, I think he nailed it.


