


@Radar alt text
Setup complete. Plating against chatgpt now and it made some horrific mistakes. My Italian navy destroyed the British Mediterranean fleet in turn 1 😂
After reading a comment by Variable elsewhere on the board (“Who else is building tables out there? I’m sure we’d all like some pics to drool over. Any more “command centers”?”), I thought it might be a good idea to have a dedicated thread which links to existing threads where members have posted pictures of their specialized A&A Global 1940 gaming tables.
I’ve collected the threads of this type which I could find, but I may have missed a few, so feel free to add other links:
Johnnymarr’s Global Gaming Table:
http://www.axisandallies.org/forums/index.php?topic=18186.0
and
http://www.axisandallies.org/forums/index.php?topic=20154.0
94Canuck’s Global Gaming Table
http://www.axisandallies.org/forums/index.php?topic=20291.0
Pelanderfunk’s Global Gaming Setup
http://www.axisandallies.org/forums/index.php?topic=20365.0
I’ve also provided thread links to a couple of A&A gaming tables which aren’t Global but which are too great-looking to be excluded:
TwistedAries’s AAA Command Center Bunker
http://www.axisandallies.org/forums/index.php?topic=18426.0
Rorschach’s AA50 3-D Terrain Gaming Table
http://www.axisandallies.org/forums/index.php?topic=18619.0
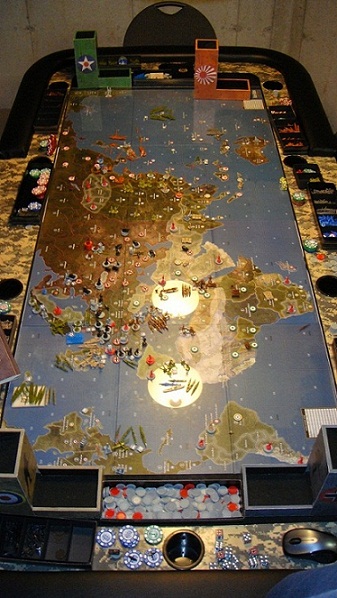
This thread could also be a convenient place to post pictures of other Global gaming tables which don’t already have their own threads. To get things started, I’ve posted below three pictures I took last weekend of my own Global setup. The first picture shows the overall layout, which consists of four card tables (the kind with folding legs) arranged in a row, with shelving units and plastic tackle boxes underneath them to hold my collection of plastic sculpts. The game board rests on a raised, cloth-covered rectangular base, and is covered with a sheet of acrylic. The second picture is a close-up of the right side of the table, showing the customized roundels I’ve sandwiched in between the board and the acrylic to replace the default ones printed on the map. The third picture is a close-up of the left side of the table, which is used to map some customized connections between the two board sections that don’t line up when they’re side-by-side. The connections are marked with white sewing thread, which shows up clearly against the black cloth even though it’s very thin.


Wow. It is like you where reading my mind. I was just thinking about other tables earlier today. I can’t wait until I get my table to a state where I can post pictured and it actually looks like a table. Right now it is a pile of wood cut to various sizes.
how can i get that lovely commonwealth roundel?
how can i get that lovely commonwealth roundel?
The file with my customized roundels is on another computer, so I’ll bring it in tomorrow and post a copy of the picture of the generic (and unofficial) Commonwealth roundel I made.
As with my other customized roundels, I pasted multiple copies of the picture into a Word document, had it laser-printed in colour at a commercial photocopy centre on full-sheet sticky-label paper, cut out the roundels one by one and stuck them on white bingo chips. Because the white sticky paper was the same colour as the white bingo chips, I didn’t have to worry too much about the slightly jagged edges of the cut-out designs, since they’re not very visible at arm’s length. If you have your own colour laser printer, however, a neater (and less labour-intensive) method would be to use Imperious Leader’s template for printing roundels on round Avery sticky labels.
Hey CWO Marc and everyone else,
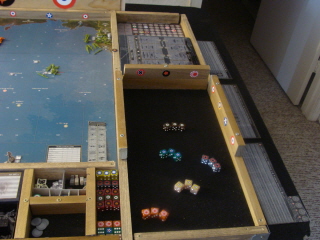
Here some updated pictures of my table (that was originally created to hold the Global game). The game that is going on is still in progress.
Hope you like?

Looks very nice!, Is is solid enough?
Terrific table! I especially like the padding all around it, complete with nice curves at the corners – it looks very professional. Are those casino-style chips I see in one part of the picture?
how can i get that lovely commonwealth roundel?
Here’s the Commonwealth roundel, accompanied by the other four customized roundels I made. The ones in this post are for Fascist Italy and for the Chinese Communist forces, and I’ll post the other two in a moment.


Here are the customized roundels I made for Vichy France and for the Free French forces.
The pictures of the five roundels didn’t all end up the same size when I made them into separate files prior to posting them, so if you copy them into a Word document for printing make sure to adjust their size on the page until they’re all the same diameter and so that they print out correctly sized as A&A roundels.


@special:
Looks very nice!, Is is solid enough?
Oh yes…it is solid! 2 sheets of 3/4 inch plywood with not just 1 set but 2 sets of folding legs.
@CWO:
Terrific table! I especially like the padding all around it, complete with nice curves at the corners – it looks very professional. Are those casino-style chips I see in one part of the picture?
Thanks! Why yes those are poker chips you see in the picture.
Thanks for doing this! This is a great resource. I’m still working on my command center, but I’ve discovered the rooms in old houses are a bit small for a G40 table… Still working on it.
Great work to everyone out there who’s command centers make the rest of us very jealous!
this is my custom table…the only thing left is the custom peice of glass…didnt realize the best price i was going to get down here in florida was going to still be over 100$…lol. decided to use hinges for a bit of a storage area for the decorative wood side with the decals i made.


just adding the rest of the pic’s…

Some pics of our table
http://www.axisandallies.org/forums/index.php?topic=8670.msg688948#msg688948
this is my custom table…the only thing left is the custom peice of glass…didnt realize the best price i was going to get down here in florida was going to still be over 100$…lol. decided to use hinges for a bit of a storage area for the decorative wood side with the decals i made.
Very nice! It was a good idea to build dice-rolling areas into the table frame.
As far as the glass goes, it might be cheaper to use plastic (like acrylic) depending on what thickness you buy, and it would almost certainly be lighter. Thin plastic also has the advantage that it can be rolled up for shipping, storage and moving.
New links added:
Katfishkris’s Global 1940 Table
(Pictures located on page 2 of the thread for 94Canuck’s Global Gaming Table)
http://www.axisandallies.org/forums/index.php?topic=20291.15
Streifenkarl’s AARHE 118" x 60" Map Table
(Pictures located on page 14 of the AARHE Map Files thread)
http://www.axisandallies.org/forums/index.php?topic=8670.msg688948#msg688948
Here is my table.

Test
These are all really cool, I think over the break I have here that I’m going to try and fashion a table (especially since I don’t have one that can fit the entire global game). I’m thinking of something simple, raised edges with cubby holes for the piece boxes and removable legs so if I have to it can sit on the floor or up against the wall when not in use.

