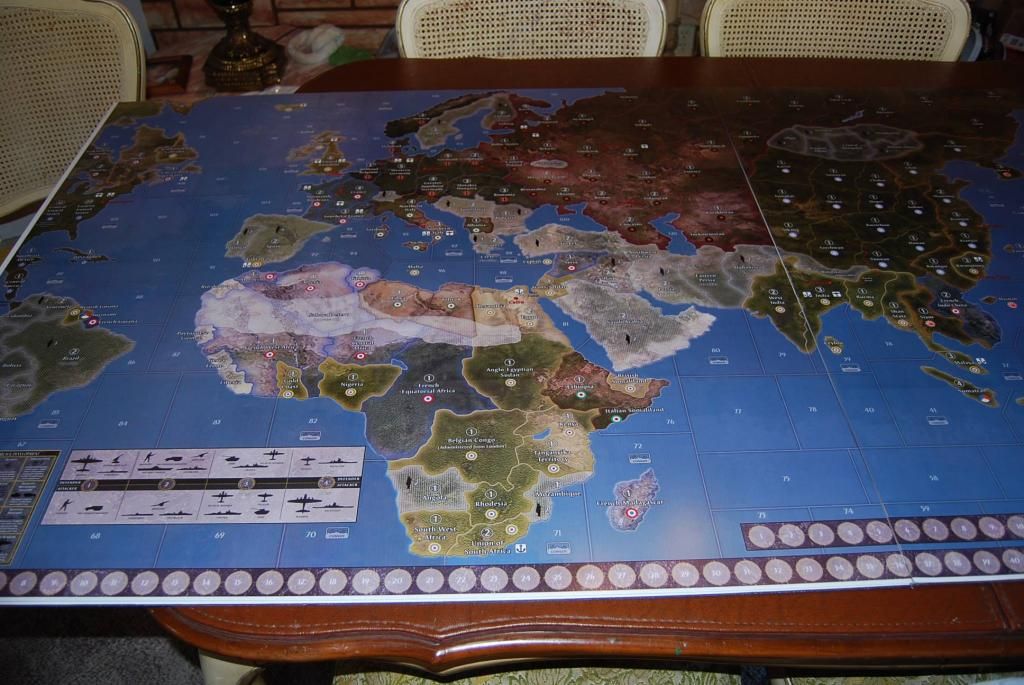
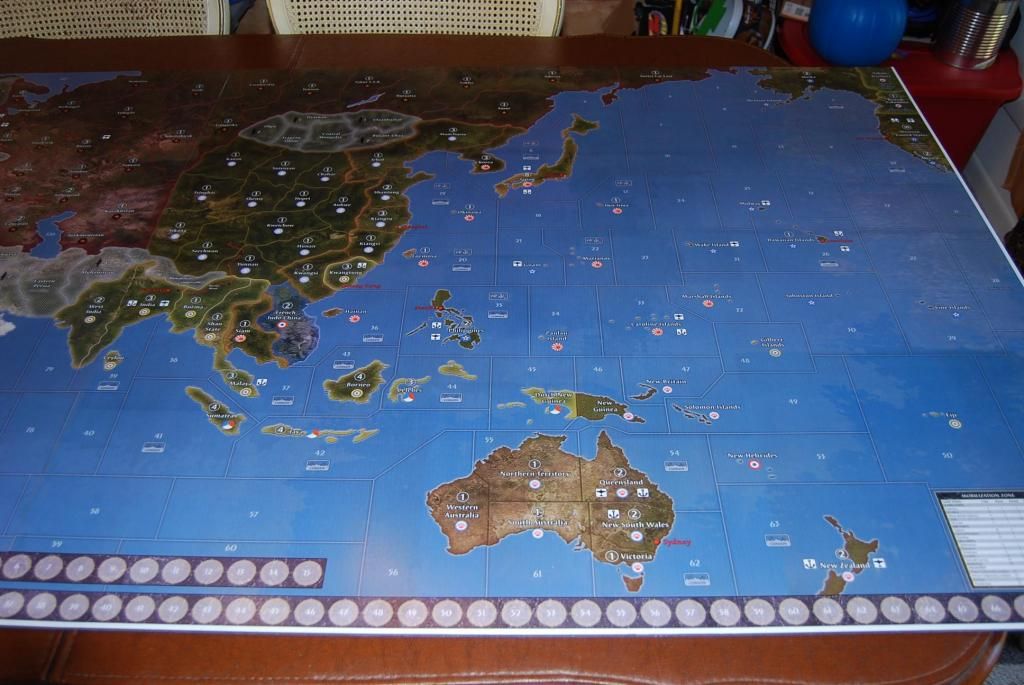
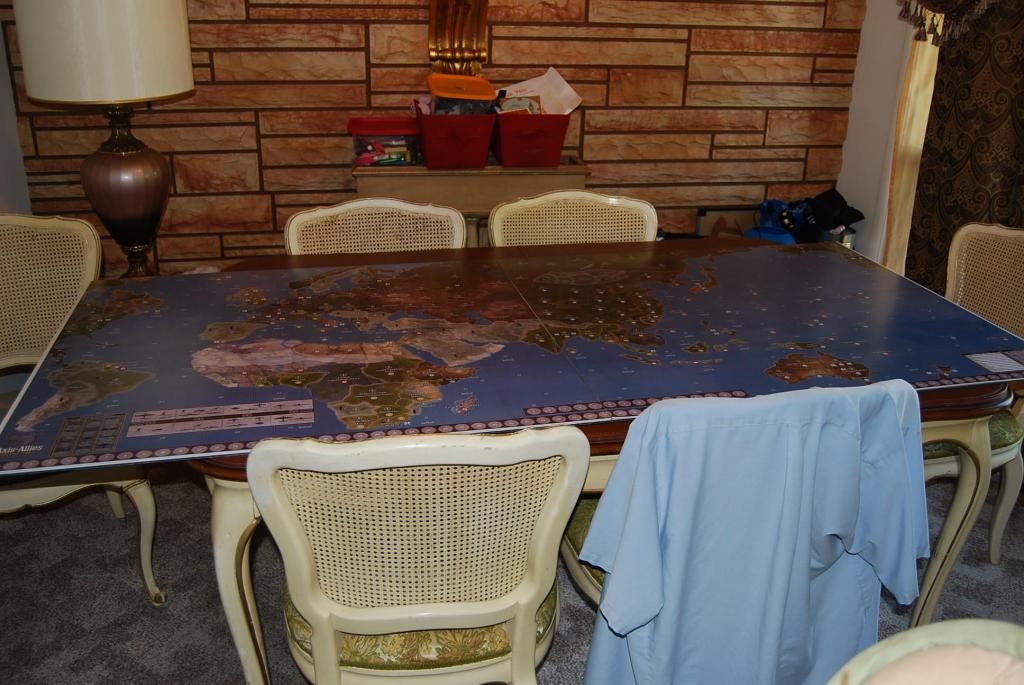
I have been playing around with different configurations for a custom table and wanted to note some things I’ve landed on that I really like. A main one thing is having the map mounted so that it can slide around as needed on top of a bigger playing area. My table is 65” x 95” in total with a 5.5” arm rest around the outside and the middle is a recessed neoprene surface. I have the OOB Global map mounted on 1/2” rigid foam with a 1/2” aluminum frame around it. This allows the map to slide up close to whoever’s turn it is, but then be in the middle so both players can roll dice In front of them without disturbing the map and in easy view of the other player. (Plus we like lots of room to roll the bones). This ability to adjust the surface along with a standing height, makes it comfortable for long uses because you can move around more and don’t feel as tied down.
Things I’ve learned and changed from original design - I originally used too big of a frame for the map and mounted it on too high of a foam block (you can see these pictures at the bottom) - it made it hard to see the other player’s dice and the big frame took up too much real estate. My global map is mounted on much thinner foam (the framing is bad, you can see if you look closely) but I also used much thinner aluminum angle for the frame. This gives just enough grip when needing to move the map around (I use furniture slides on the bottom, which glide very nicely on the neoprene) but doesn’t make the whole thing too bulky. Having it an inch or so off the surface keeps the dice off, but isn’t so heigh that you can’t see the other player’s dice rolls. When playing other versions (such as Zombies) the board is much smaller, but it can easily swap in and out on the same table since it can move around where ever it is needed or be pushed aside.
I originally made it normal table height, but found long reaches while sitting were harder and it just felt cramped. Standing height with a bar stool is a great way to have the best of both worlds.
The 5.5” rim around the table itself gives you a nice arm rest that doesn’t interfere with the gaming surface. I’m playing with how to best add some cushion to this part - open to suggestions. Sometimes I just lay a piece of leftover neoprene on it.
Dice bounce nice on the neoprene and stay off the floor. It also feels nice and has enough give to allow things to slide but be picked up easily. Wouldn’t definitely go with neoprene again as a surface covering.
I made the drawers open to the inside of the table so you can stay hunched over the action while accessing and stowing stuff away. 50/50 on whether I would keep this if I were to do it again. If I were doing it again, I might try to build customer drawers form scratch using actual drawer glides, but that was beyond my ability when I first did this, so I just used clear plexiglass boxes with aluminum pulls mounted on them. It’s nice having them clear, and I was happy with how the pulls came out, but without glides they can be a little fussy sliding in and out of their slots.
I originally designed the table so that I could put a cover surface back on top when not in use, but find I don’t really ever do that, so if I were to do it again, I might not mess with that part (I never even finished staining those as you can see in the pictures).
CF362D52-269F-4480-8CBB-08139099138F.jpeg A9E12EA1-66EB-4671-86AC-68C62FD30AD5.jpeg 858DE1F2-030A-4D5A-93E4-70A7D1180ADB.jpeg 8F513EE0-DA37-4BA9-880E-4D5EF7BF431F.jpeg F0188165-757B-4CC1-BF67-5045832283C9.jpeg 2E3CD627-0D31-4121-ACF8-682F9F58A40B.jpeg
Global 1940 (metal map)
-
Terrific-looking game table! Very nice job. When you say “drilling all the pieces as well”, do you mean drilling holes into the undersides of all the plastic combat units and inserting magnets into them?
-
Awesome man! Can’t wait for more pics with the magnets.
-
What an awesome board! Gotta put Honolulu on the correct island, though.
-
Honolulu is on the wrong island by default. Ask Larry Harris why he put it there.
-
@CWO:
Terrific-looking game table! Very nice job. When you say “drilling all the pieces as well”, do you mean drilling holes into the undersides of all the plastic combat units and inserting magnets into them?
Exactly. I use a 2mm drill and then bore it out with a 3mm drill. Using a 3mm drill on the chips without a 2mm hole first will crack them. I just use the same process for the miniature bases. The magnets I am using are 3mm diameter and 1mm thickness. I put a little super glue in the hole I drill then insert the magnet. On planes I use 2mm magnets and have to make sure the polarity is matched with the carriers or else the planes will fly away, hehe. I am also putting small 10mm felt circles on the bottom of the pieces that have bases on them which is infantry and artillery(I added bases to them to make it easier to attach a magnet). I will post some pics of my progress.
-
May the force be with you while drilling, Cyanight ;-)!
-
Exactly. I use a 2mm drill and then bore it out with a 3mm drill. Using a 3mm drill on the chips without a 2mm hole first will crack them. I just use the same process for the miniature bases. The magnets I am using are 3mm diameter and 1mm thickness. I put a little super glue in the hole I drill then insert the magnet. On planes I use 2mm magnets and have to make sure the polarity is matched with the carriers or else the planes will fly away, hehe. I am also putting small 10mm felt circles on the bottom of the pieces that have bases on them which is infantry and artillery(I added bases to them to make it easier to attach a magnet). I will post some pics of my progress.
Thanks for the details. It’s clear that you have good eyesight, a steady hand and lots of patience to carry out this kind of work on a full set of game sculpts. :-) I like the image of a fighter coming in for a carrier landing and bouncing off the deck because of a polarity problem – I think the carrier’s LSO (Landing Signals Officer) would characterize that as a wave-off.
-
@CWO:
Exactly. I use a 2mm drill and then bore it out with a 3mm drill. Using a 3mm drill on the chips without a 2mm hole first will crack them. I just use the same process for the miniature bases. The magnets I am using are 3mm diameter and 1mm thickness. I put a little super glue in the hole I drill then insert the magnet. On planes I use 2mm magnets and have to make sure the polarity is matched with the carriers or else the planes will fly away, hehe. I am also putting small 10mm felt circles on the bottom of the pieces that have bases on them which is infantry and artillery(I added bases to them to make it easier to attach a magnet). I will post some pics of my progress.
Thanks for the details. It’s clear that you have good eyesight, a steady hand and lots of patience to carry out this kind of work on a full set of game sculpts.  :-)  I like the image of a fighter coming in for a carrier landing and bouncing off the deck because of a polarity problem – I think the carrier’s LSO (Landing Signals Officer) would characterize that as a wave-off.
I actually have the polarity switched for axis vs allied CV. There is no possible way to accidently put an allied plane on an axis CV or vice versa. :)
-
May the force be with you while drilling, Cyanight ;-)!
Thank you, its definitely a lesson in patience.
-
I actually have the polarity switched for axis vs allied CV. There is no possible way to accidently put an allied plane on an axis CV or vice versa. :)
An ingenious detail – and a potentially novel form of defense against kamikaze attacks. :-D
-
Super cool! Besides a bump messing up a game, are the magnets strong enough to stick if the board goes vertical?
-
@cb4:
Super cool! Besides a bump messing up a game, are the magnets strong enough to stick if the board goes vertical?
Yes they are in fact… I bet with increased chip stacks though they might fall. One of the reasons I modified the chips to the following. With the added new green chip (3) and blue chip (10) I can now represent any unit from 1-20 using between 0-4 chips. Since Global 1940 is very spread out its difficult to determine the quantity of an army from a distance. The various colors, gray(1), green(3), red(5) and blue(10) will now help resolve that problem by reducing the stack size.
1 No chip
2 Gray
3 2x Gray
4 Green
5 Gray + Green
6 Red
7 Gray + Red
8 2x Gray + Red
9 Green + Red
10 Gray + Green + Red
11 Blue
12 Gray + Blue
13 2x Gray + Blue
14 Green + Blue
15 Gray + Green + Blue
16 Red + Blue
17 Gray + Red + Blue
18 2x Gray + Red + Blue
19 Green + Red + Blue
20 Gray + Green + Red + Blue
21 2x BlueAs you can see the max stack size for units up to 20 is 4 which is much easier to count from a distance and should stick the board no problem. The chips hold together very nicely. I will post a pic when I get all the chips done.
-
Nicely planned out to reduce the max stack size. Now, with the right mounting hardware (and a large enough wall :-)) you’ll be able to display a game as artwork!
-
Would you be willing to share your edited file? I would be very interested in printing it myself with your additions.
Thanks!
-
Would you be willing to share your edited file? I would be very interested in printing it myself with your additions.
Thanks!
Yeah me too actually!
-
Great job Cyanight,
I love to see members take the time and effort to take their gaming experience to another level. I like your Research and Development charts a lot better than mine, if you help the other members print their own version of your map, I will recommend you for a customizer badge.
-
But he should share his work with a link so others can enjoy. Use Mediafire
-
@Imperious:
But he should share his work with a link so others can enjoy. Use Mediafire
Agreed.
-
Another thought. You could also put us in touch with the sign company so we could purchase the printed map directly.
I’d suggest you resell them, but that would likely put you in trouble with Avalon Hill, the publisher of Axis & Allies.
Thanks again for sharing. It is an awesome idea!
-
As a customizer, I never seek a profit for anything, however… I have no problem charging for expenses that come out of my own pocket.